Pluck Dissection

As a Physics teacher, I’ve got a long list of classic demonstrations at my disposal for use in teaching everything from pressure to electricity to conservation of energy. I’ve had to teach some Biology in the past and I think it’s fair to say that Biologists are not so well resourced when it comes to demonstrations.

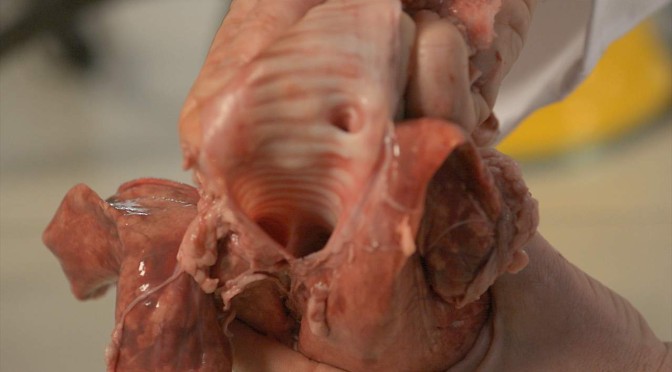
A large part of the reason for doing demonstrations in class, I think, is to get our students to look closely at the world, to really observe it in detail. In Biology, that means taking a close look at living things and the components of which they’re made. This video is unlike any of the other demonstration films we’ve made so far, but it was one of the most interesting I’ve worked on – I came away convinced that if I teach Biology again, I’d definitely make more use of dissection as a teaching tool.


Get Set Demonstrate logoThis film was produced for the Get Set Demonstrate project. Click through for teaching notes, and take the pledge to perform a demonstration to your students on Demo Day, 20th March 2014.

I love the smell of traffic in the evening

See those blue bars in the photo above? That’s you, that is.

Huge thanks to everyone who’s tweeted, said something positive on Facebook, posted to Boing Boing, whatever – yesterday was this site’s busiest day to date by a factor of five. Then today’s hit twice yesterday’s page views. Amazing, not to mention gratifying, but traffic is nothing compared to all your positive comments.

This site is itself an experiment, trying to plug a gap we’ve been worrying about for years. It looks like we’ve struck a chord. Fantastic, and thank you.

If you’re a teacher in the UK: join Demo Day 2014. Take the pledge to perform a demonstration for your students, on 20th March. It doesn’t have to be one of the demos featured here, the choice is up to you. But take the pledge, and spread the word:

Get Set… Demonstrate, at the British Science Association.

We’ve another of our demo films each day this week (and on Monday – bonus!), and we’ll keep the site ticking over until the grand premier of our epic Demo documentary film. Early March for that, maybe?

Meanwhile, it looks like Alom and I are making three more films of biology practicals in the near future. Who’s next? Is it time for some maths, or computer science? Or would the physicists get jealous?

Collapsing Can

The collapsing can demo is one I loved seeing for the first time when I was at school, although my teacher used a tin with a screwed down lid which took a little more time to cool down. In some ways I prefer the version using a can with a screw lid because the additional waiting time makes for an even more dramatic “collapse”. Doing the demo with a drink can is of course far cheaper (and I think, more reliable as it doesn’t depend on the lid being screwed down properly) and I suspect this is why the approach we use in our video has become far more widespread in schools.

I like the demo a lot but, as I hope we’ve managed to convey in the video, I think we need to be careful how and why we use it in our lessons. This is a really fantastic demo for using the Predict, Observe, Explain (POE) approach as the explanation of what’s going on is not entirely straightforward – there are a couple of things relating to the behaviour of particles and the action of forces that need to be considered and this can lead to some really interesting discussion with students, providing they’re familiar with the relevant concepts.

We’ve suggested in our video that the collapsing can demo can be used in conjunction with another demo, as a way of “scaffolding” (I really hope I’ve used that term correctly – I think this may be the first time I’ve used it in writing in this context).

Once you’ve done the demo live in class, you’ve got the perfect justification for showing your students this video of a rather more spectacular demonstration of the same physics at work:


Get Set Demonstrate logoThis film was produced for the Get Set Demonstrate project. Click through for teaching notes, and take the pledge to perform a demonstration to your students on Demo Day, 20th March 2014.

Magic in the classroom: The Iodine Clock

As well as being a science geek, I’m a magic geek. I’m not sure if anyone’s done the research on this, but I suspect those are two groups of people where there’s a significant overlap. I’ve got an entire live science show I do based around my love of magic and my somewhat lame attempts to become a magician and I include this demonstration as a highlight in the show. Like many of the demonstrations we’ve filmed, I don’t think video can do justice to how amazing it is to see in real life – it appears to be genuinely magical and always gets an “ooh” from the audience.

I’ve used the iodine clock in class purely for the effect it has of enthralling my students, but, as I hope the video shows, it can be used to achieve particular learning objectives. Mind you, I hope it’s clear that we at sciencedemo.org think “enthusing students” can be a sufficient justification for using a particular demo, if you’re going to take that enthusiasm and use it to help students get more out of your science lessons in general.


Get Set Demonstrate logoThis film was produced for the Get Set Demonstrate project. Click through for teaching notes, and take the pledge to perform a demonstration to your students on Demo Day, 20th March 2014.

Universal indicator-a-go-go

Spotted on Twitter:

Fantastic. Emma later noted that it’s absolutely as simple as it looks: a condenser tube filled with universal indicator solution, with acid added at one end and base at the other. Then you “wait ages” – ie. a couple of weeks.

Mighty pretty.

Curved space-time

I love this demo, but it’s one of those oddly bimodal ones – you can interact with it in two different ways:

  1. You throw marbles at it yourself, and stare at them. This is delightful, though rarely very informative.
  2. You’re led through a structured exploration by a demonstrator, as here. This is informative, but less delightful.

The challenge for the demonstrator is to balance their audience’s natural inclination to roll the marbles themselves with their inclination to retain control and direct attention. That is: play vs. lecture, or perhaps more appropriately here, interactive exhibit vs. demonstration.

We explore this a little in the forthcoming Demo film, which starts with a candle flame. We all love staring at the flames of an open fire, but we don’t necessarily learn very much about combustion by doing so. How we use a demonstration is perhaps more important than the demonstration itself. That’s certainly the case for teaching, and I suspect also true for storytelling.

Video found via The Kid Should See This, which also links to this useful video showing assembly.


Acoustic levitation using standing waves

Most physics teachers will have to demonstrate standing waves at some point in the school year and there are a number of standard demonstrations which can be done with school lab equipment. When teaching about them, I also show videos of standing waves I can’t recreate in the classroom and the one above is a lovely addition to my resources for this topic. This video also reminded me of a piece of art I saw at the Tate Modern several years ago – Kinetic Construction (Standing Wave) – which was the first time I saw a Physics demonstration presented as “art”.

Sharing science through story


Former FameLabber Feargus McAuliffe speaks at TEDxDublin about how he to learned to share science by telling stories about it.

It’s an interesting watch, but I’d go much further than Feargus: I think the peculiarity is the formalised ‘present your evidence’ model of science, and that in the general case, all communication is storytelling. Indeed, it’s mostly scientists who baulk at that idea – for people in the media and comms worlds, their surprise is that this is even a discussion.

One of the reasons I believe demonstrations are valuable is that they present ideas from science in a (usually very simplified) narrative structure. You begin with an arrangement of apparatus; something happens; the state of the apparatus has changed.

Demos are stories.

Preparation

We’ve been noodling away on ScienceDemo.org for several months, and I felt it was time to try something different with how the site looked and behaved. Big Things are coming (*cough*), and we want the site to do a better job of presenting them.

I also realised we’ve some great photography here, and that many of our posts revolve around video – by us and others. Time to make that more prominent, and see if a more magazine-like feel works… or not.

Oh, and next week it turns out there’s a server move scheduled, so doubtless things will go very pear-shaped and we’ll disappear for a few hours. Days. Whatever. But for the moment:

Hello. This is ScienceDemo.org. You’re looking almost as dashing as we are.

Polish

When we last left the Demo documentary film I’d just reached ‘first cut’ – the film was watchable though very much unfinished. Very unfinished.

That first fully-assembled version was ‘cut 03’, and we’re now on ‘cut 08’. In between, the film got longer. We had a viewing. It got shorter. We re-shot one of the scenes (for technical reasons, happily – editorial reshoots are always harder). It got longer again. I found a duplicated sequence I’d stupidly left in there. It got shorter once more.

That was the easy stuff, though. With a film like this there’s not a great deal of scope to reorder or second-guess oneself. The die was pretty much cast once we’d finished the script, and while we made plenty of changes as we filmed there were relatively few decisions left for the edit. With most documentaries you agonise about big structural changes for days and weeks, but we simply couldn’t afford any of that. We’d shot what we’d written, which at least makes the edit simpler.

No, the time-consuming part has been, for want of a better term, polish. Most scenes have seen at least two completely different colour treatments at different times. Sensor noise has been processed out of a significant number of shots, eating dozens of hours of processor time. There are graphics overlays of one sort or another on a couple of dozen shots, which took anything from a few minutes to sort to the better part of a day. At one point I found myself painting out a fly, frame by frame. That nobody will ever notice is rather the point.

Are we done? Almost. We’re now at the stage where we’re arguing about individual shots, and whether things should go a little quicker in places, or need room to breathe, or whether this shot needs a graphic and this one doesn’t, or vice-versa.

We’re polishing.


Theatre, props and explanations, oh my!