As well as being a science geek, I’m a magic geek. I’m not sure if anyone’s done the research on this, but I suspect those are two groups of people where there’s a significant overlap. I’ve got an entire live science show I do based around my love of magic and my somewhat lame attempts to become a magician and I include this demonstration as a highlight in the show. Like many of the demonstrations we’ve filmed, I don’t think video can do justice to how amazing it is to see in real life – it appears to be genuinely magical and always gets an “ooh” from the audience.
I’ve used the iodine clock in class purely for the effect it has of enthralling my students, but, as I hope the video shows, it can be used to achieve particular learning objectives. Mind you, I hope it’s clear that we at sciencedemo.org think “enthusing students” can be a sufficient justification for using a particular demo, if you’re going to take that enthusiasm and use it to help students get more out of your science lessons in general.
This film was produced for the Get Set Demonstrate project. Click through for teaching notes, and take the pledge to perform a demonstration to your students on Demo Day, 20th March 2014.
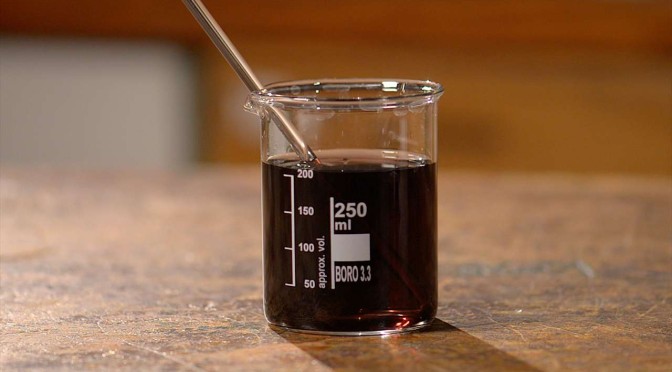
Fantastic. Emma later noted that it’s absolutely as simple as it looks: a condenser tube filled with universal indicator solution, with acid added at one end and base at the other. Then you “wait ages” – ie. a couple of weeks.
I love this demo, but it’s one of those oddly bimodal ones – you can interact with it in two different ways:
You throw marbles at it yourself, and stare at them. This is delightful, though rarely very informative.
You’re led through a structured exploration by a demonstrator, as here. This is informative, but less delightful.
The challenge for the demonstrator is to balance their audience’s natural inclination to roll the marbles themselves with their inclination to retain control and direct attention. That is: play vs. lecture, or perhaps more appropriately here, interactive exhibit vs. demonstration.
We explore this a little in the forthcoming Demo film, which starts with a candle flame. We all love staring at the flames of an open fire, but we don’t necessarily learn very much about combustion by doing so. How we use a demonstration is perhaps more important than the demonstration itself. That’s certainly the case for teaching, and I suspect also true for storytelling.
“With about 30 students watching from their desks, a snakelike flame tore through the air, missing the students closest to the teacher’s desk, but enveloping Alonzo Yanes, 16, searing and melting the skin on his face and body, according to witnesses. He was in critical condition on Friday[…]”
Here in the UK, I think we’d more commonly refer to the demo as “Flame colours”, and at the head of this post is a photo I took of it a few years ago. As best I can tell, the cause of the accidents in the US has been demonstrators topping up the flame straight from the methanol bottle, leading to the ignition of a large volume of fuel vapour.
Now, I’d hope most people reading this blog will be wincing right now. It was drilled into us (in school) that you never open a bottle of fuel near a naked flame, and that the correct procedure here is to ensure the watch glasses are cold before adding a small amount of fuel (typically with a pipette), then sealing the fuel bottle and removing it to a safe distance, before lighting the mixture in the watch glasses.
That would be standard lab practice, and it’s near-inconceivable that a teacher would pour meths from a bottle directly onto a flame. However, one thing we learned from SciCast is that we’re into the second generation of science teachers who’ve never really ‘done’ practical science. Recent science graduates don’t necessarily know how to handle flammable materials; they may never have been taught.
[EDIT 9/1/2014 – The RSC’s Education in Chemistry blog has picked up the story. Their post includes a quote from Steve Jones, Director of CLEAPSS.]
[EDIT 2 15/1/2014 – I somehow missed the NY Times’ follow-up story about the school involved in the incident above being inspected by the Fire Department, and being given notices to improve on a range of issues. Also, for the UK audience I should note that the Scottish equivalent of CLEAPSS is SSERC.]
Most physics teachers will have to demonstrate standing waves at some point in the school year and there are a number of standard demonstrations which can be done with school lab equipment. When teaching about them, I also show videos of standing waves I can’t recreate in the classroom and the one above is a lovely addition to my resources for this topic. This video also reminded me of a piece of art I saw at the Tate Modern several years ago – Kinetic Construction (Standing Wave) – which was the first time I saw a Physics demonstration presented as “art”.
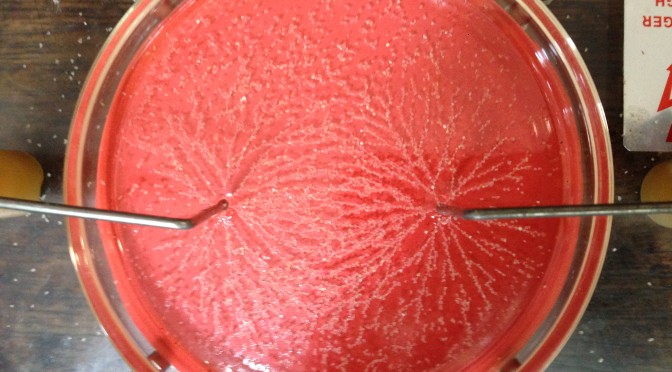
I hope that most school children get to see that sprinkling iron filings around a bar magnet produces a pattern which shows the shape of the magnetic field around the magnet. It’s a very simple, yet useful, way of making something invisible, visible. What many school children won’t get to see is that you can do something very similar with electric fields, using semolina instead of iron filings. The picture above is from a demonstration I showed my year 13 (A-level) students last week – the instructions for how to set it up can be found at the Practical Physics site.
A tip: it’s lovely for the students to see this for themselves, but the apparatus is tiny so use a camera to project it onto your whiteboard as well. I forgot to take my webcam into school so I used my phone to take a photo and put that up on the whiteboard so we could look at the demonstration closely and discuss it. I encouraged my students to take photos too, as I did when we investigated magnetic fields – I’m not convinced getting students to draw what they see is terribly useful in this case. What do you think?
Many of us stumble upon the Leidenfrost Effect accidentally when cooking. The 2010 winner of the SciCast Best Physics film is one of the best short films on the subject I’ve seen, but the video above, also made by students, introduced me to a surprising new effect related to it. I’m pretty sure Jonathan, who’s away in Abu Dhabi at the moment, is going to love it.
The British Interactive Group is somewhere between a professional association for science communicators and a self-help group. They host the excellent (as in ‘everyone who reads this blog should sign up’) BIG-Chat email list, and run an annual ‘Event.’ Which is sort-of a conference, but … well, you’ll just have to go to experience it.
Too late this year, though, as it’s on in Glasgow right now. Tonight’s shindig was the annual Best Demo Competition, which is sort-of a performance competition and sort-of a soapbox session for trotting out just plain neat ideas. There’s no more terrifying audience for a science communicator than the members of BIG… and no more forgiving an audience, either.
I’m missing the Event this year, but thanks to the lovely folks at Science Made Simple there was a live stream of tonight’s performances, and you can view it for yourself. Be warned – the audio is patchy (it gets better in the second and third segments), and there are many drop-outs. So it’s almost like being there, if you imagine yourself drinking heavily before showing up. Which would be traditional.
Some cracking ideas, some lovely performances, and some stuff that plain doesn’t work. Great combination.
Part 2:
…and the results (with a few extra demos because… because Best Demo):
Congrats to everyone who signed up to take part. Keep reading below for Elin’s thoughts on entering from last week…
I really like this demo. It is simple and surprising, yet deceptively subtle and complex.
It also draws my attention to explanations. The first time I saw Steve present this he didn’t explain it, but I was transfixed. Effective demonstrations don’t always come with explanations. Sometimes less is more.
I’m no physicist, but I’m not fully satisfied by the explanation of what’s going on here. In that sense, despite the beautiful slo-mo, I preferred the first version I saw. I find this demo intensely pleasing despite it leaving me hanging.
Don’t get me wrong, I’m not advocating that we all go around deliberately producing unsatisfying explanations or consistently refusing to give any at all, but what works for me is that I’m left wanting to get my hands on a set of these to test it out, to explore and investigate the phenomenon to try to understand it better. Surely that’s one of the indicators of a great demo?